WHAT IS PROCESS CONTROL?
Define process control? Everyone knows what process control is, right?
Let’s collect some data. A quick spin around the internet reveals the following:
WIKIPEDIA DEFINITION OF PROCESS CONTROL
Process control is a statistics and engineering discipline that deals with architectures, mechanisms and algorithms for maintaining the output of a specific process within a desired range.
BUSINESS DICTIONARY DEFINITION OF PROCESS CONTROL
Activities involved in ensuring a process is predictable, stable, and consistently operating at the target level of performance with only normal variation.
PC MAGAZINE DEFINITION OF PROCESS CONTROL
The automated control of a process.
NASA DEFINITION OF PROCESS CONTROL
Process Control consists of the systems and tools used to ensure that processes are well defined, performed correctly, and maintained so that the completed product conforms to established requirements.
OUR DEFINITION OR PROCESS CONTROL
The Phoenix Group, LLC has provided our clients this working definition of process control: the systematic and continuous reduction of variation.
Systematic: A defined and disciplined approach
Continuous: Executed inexorably
Variation reduction: Squeezing the range of variable settings and inputs utilized
We’ve successfully applied our definition of process control to an extremely wide range of activities including manufacturing, teams, problem solving, business processes, sport, and health and fitness.
Advancements in device technology will continue to increase your capacity to reduce variation. Wireless technology, equipment connectivity, computer controls, and a myriad of electronic measurement devices contribute to you learning more about everything from your manufacturing process to your golf swing.
PROCESS CONTROL PROCESS VARIABLES FOR STAMPING PROBLEMATIC PARTS
Every stamping plant has one—the part that always has issues. Tackling this type of problem requires a systematic approach to solving the mysteries surrounding this part. Before you dive deep into the formability analysis of the panel, first, familiarize yourself with the details of the operation and the historical problems associated with this particular part production. Gather all the data available to clearly define the problem(s), and then begin collecting data, which are among the first steps of the 8-Step Problem Solving Model shown below.
8-STEP PROBLEM SOLVING MODEL FOR PROCESS CONTROL
- Contain the Problem
- Define the Problem
- Gather and Analyze Data
- Develop Possible Solutions
- Implement Solutions
- Measure Impact
- Adjust or Make the Solution Permanent
- Celebrate Your Success
4 CATEGORIES OF INPUT & PROCESS VARIABLES
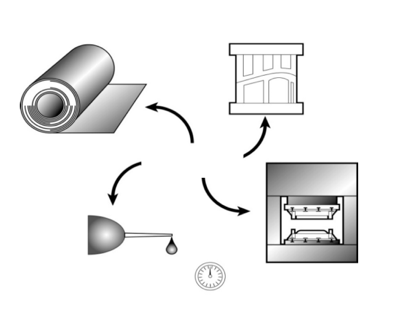
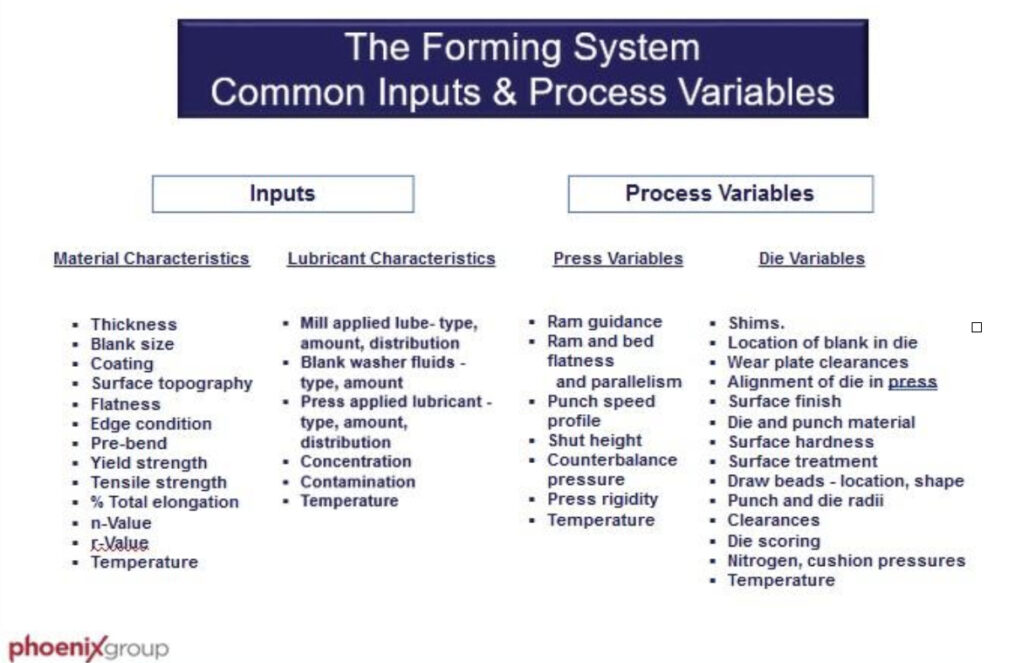
We discuss in detail the four categories of inputs (Material, Lube, Press, and Die) during our training session. Use this as a starting point and make a list of all the required details of each of the inputs.
This should be an event; create a team of individuals from all aspects of stamping (maintenance, tool and die, quality, production, and management). Let each of the subject matter experts assist in the investigation. This is also a teaching moment; each team member will be aware and better informed of the sources of variation.
MATERIAL INPUT VARIABLES
The list should include as many of the aspects of the material as possible: grade, coatings, mechanical properties, age, surface roughness, edge conditions, blank or coil width, pitch or length, angles, flatness, and parallelism. Gather a sample of the material and measure the actuals for each of the requirements and compare them against nominal and tolerance requirements. This is not going to be quick or easy.
LUBRICANT INPUT VARIABLES
Create a list of requirements for the lube. What is the type and weight coming into the plant, what happens as the blank passes through the washing and/or reapply stations? Note roll pressures, nozzle selection(s), equipment condition, amounts of lube top and bottom, before and after each operation.
PRESS PROCESS VARIABLES
The subject matter experts will be critical in defining the press variables. This is not just the shut height and cushion pressure, it will include counterbalance settings, press parallelism, bolster functions, pin patterns, Pneumatic, hydraulic, nitrogen, or mechanical pressures and settings, electrical controls, centering stations, sensors, and mechanical functions. Identify and check for proper settings and function of each of these variables and document them as part of the overall forming recipe.
DIE PROCESS VARIABLES
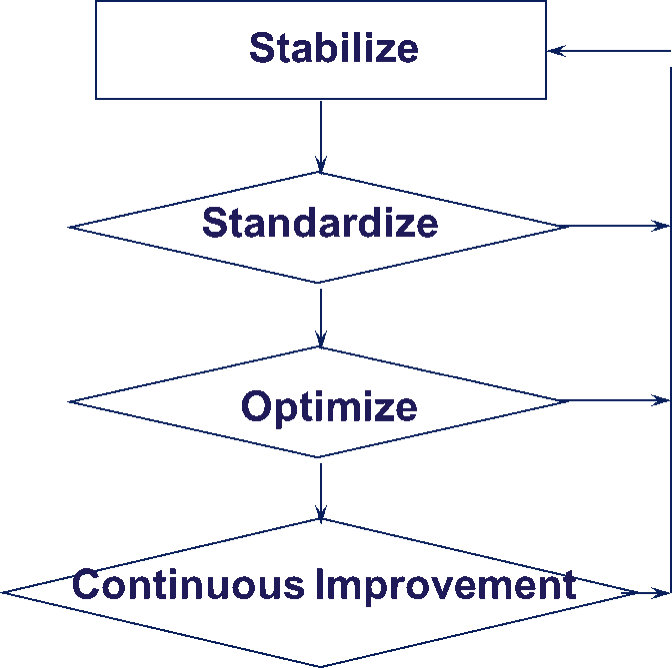
Finally, we come to the die variables. You will want to measure, compare, and document all the variables at the basic condition. This will include wear plates, pins, bushings, stop blocks and balance blocks. The radii will also need to be evaluated and corrected for trueness and polish. The gauge settings, balance block and shim sizes, clearances; punch to binder, lower binder to upper binder, punch to cavity, lower die to upper die, will need to be verified of proper settings. Check die materials for proper hardness, surface finishes, and material types. Note any coatings or surface treatments and their conditions and/or intervals.
This is now your documented detailed recipe for producing the part. You have identified most of the variables to the forming operation and brought it back to a basic condition. The next step is to make sure the output repeats. This can easily be checked by pulling sample draw shells and stacking them on top of each other, note any variation in draw in, draw lines, hard marks, and control points. If the parts are within 3mm of each other, it is now time for a strain analysis.
CAPTURING PROCESS INPUT DATA POINTS & MEASURING VARIATION
During the panel investigation, a formability analyst will try and capture as many process input data points as possible (Figure 1). If the stamping process is stable (repeatable), there are no unacceptable quality issues, and the formability status is safe, those inputs and process settings form the baseline of the recipe for that specific part. Think of it as the zero point, if all the material comes in with all the same mechanical properties, surface roughness, blank size and shape, lube type and amount at the same temperature, what would we have to be concerned about? How about the wear of the die or the stamping press after so many hits?
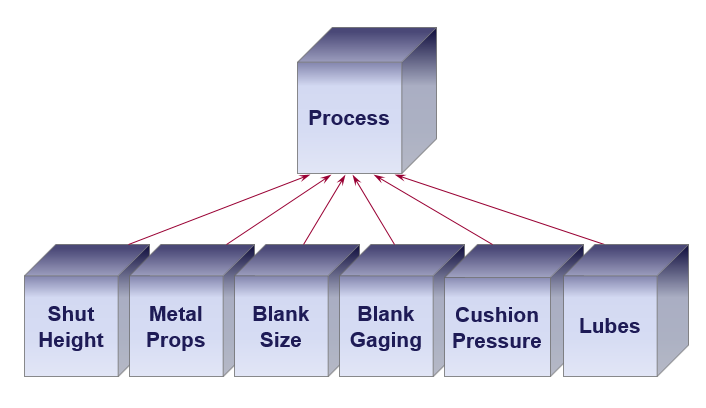
Figure 1
Since there is variation in the material, lube, press, and the die, we need to better understand which input variable affects the expected output (a quality part) of the stamping process. Think of it this way, if I make an adjustment to this control point, can it affect the part? If an input has variation (which it does) how much variation can be tolerated before it affects the process. To truly understand this methodology, we first must identify how to measure the variation. Mechanical properties such as yield strength, tensile strength, and elongation can be measured using the tensile test. We can get an accurate values from this type of testing. What do we do with that information other than say it’s within or not within the specification?
Let’s look at the output value of Yield strength from the tensile test and examine it a little closer. If the specification for Yield strength for part x is a minimum value of 170 MPa and the plant receives material at 160 MPa what would happen? It would be rejected because it does not meet the minimum requirement and the plant could have issues with running it. Now, what happens if the plant receives material at 190 MPa? It’s above the minimum specification, so the plant would put it up on the de-stacker and try to run it, right? If the part splits out or does not run in enough, would there be some adjustment made? Adding some lube, or adjusting the cushion pressure may quickly produce an acceptable output to the process but what do we need to understand about this variation?
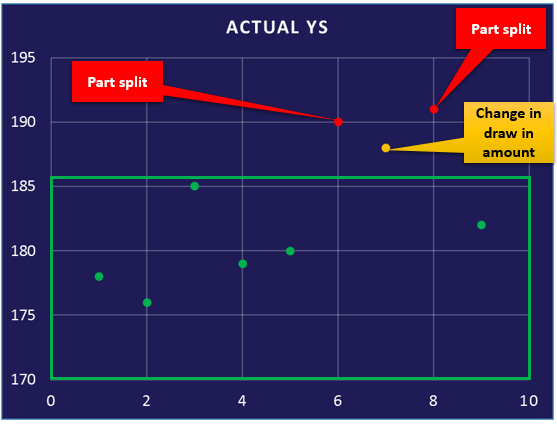
Figure 2
The process is not robust enough to handle that 20 MPa variation of yield strength without some sort of adjustment being made. There is a very specific measurable (yield strength) from the tensile test, identified on a lift tag or coil certification, and it is trackable. Using this information to understand the frequency and severity (Figure 2) of this issue can allow the plant to enhance the robustness of the tool to absorb the variation inherent to the yield strength variable. If the plant just makes an adjustment to the process to get the material to run, the result is a process that will quickly become out of control. If we understand, by measurement, the current level of variation we can gain a better understanding of which inputs are key inputs to the forming process and what control plans or improvements should be performed. This is the basis for continuous improvements and will result in increases of overall efficiency.
GET HELP MEASURING KEY VARIABLES IN PROCESS CONTROL FROM THE STAMPING EXPERTS AT PHOENIX GROUP
Process control in stamping ensures consistent product quality by closely monitoring and adjusting various parameters. By doing so, it minimizes waste, reduces the frequency of defects, and increases operational efficiency, which in turn lowers production costs. Furthermore, effective process control allows for quicker response to issues and facilitates seamless scalability for high-volume manufacturing.
If you’re interested in learning how The Phoenix Group can drive improvement at all levels of your organization, contact us today.


